It's no secret that Aaron and I LOVE traveling. We're always game for travel of all kinds, whether it's a cruise, a relaxing all-inclusive resort in Cancun, or an amazing European adventure. A few months after we were married, Aaron decided that one of his goals for us was to drive through and eat or stay in every single one of the 50 states. Also, as a rule, we had to get out and take a picture with the state sign, wherever we were. This has led to some pretty epic photos on the side of highways and in places that probably weren't the safest to be taking selfies (see Arkansas for a good laugh).
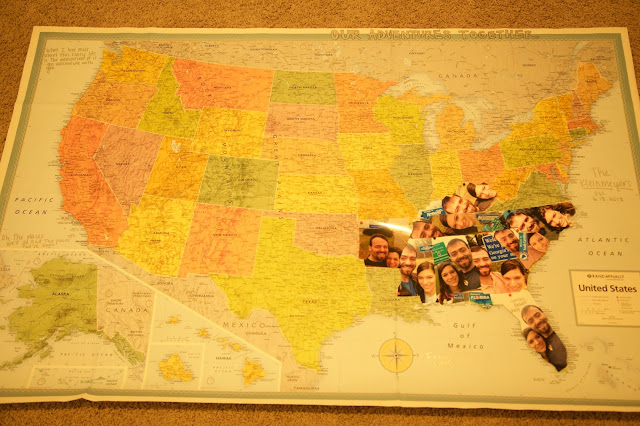
For our 2014 spring break, we traveled through nine different states and stayed at nine different hotels, taking state sign pictures in all of them. A few months later, I was looking for a fun gift to create for my hubby for our first anniversary, the "paper" anniversary. As I was scrolling through Pinterest, I saw a couple cute maps. That got me to thinking, wow, if I could make a personalized one, that would be a great use of all those pictures we've been taking. And so, I started a photo map for us. Here's the map complete with pictures from our Southeast Spring Break trip:
This spring, we went on an epic Southwestern Adventure, and had several photos to add. So, I'm back at it again, this time with step by step instructions on how to make your very own photo map!
You'll need:
- Three foam boards
- A large map (I got mine at Staple's for about $8)
- Spray Adhesive
- Scissors
- Tape
- Paper
- Push pins
- A tape measure or ruler
To assemble the board that your map will sit on, measure out the length of your map. Cut your foam boards (you may need an Exacto knife for this), and then tape them together so that they are one big board that fits your map. Use the spray adhesive on the foam board, and then mount your map on the front. Now you're ready to start with your states.
To create the states, lay a piece of paper over the top of the state. Carefully trace the shape of the state onto the piece of paper with a pencil. It doesn't have to be perfect, just do your best!
Next, cut out your shape from the piece of paper. Lay it over the state and see how you did. For California, I used a couple different pieces of legal paper, and then I taped them together to form the state.
Next, measure all of your state shapes and write their measurements on them. You need to know what size of picture to print for each state. For the Southeast, this was really easy, because most of the states were right around 4x6'', give or take. Keep in mind that some states will be smaller than 4X6, so choose your photos wisely. It's also easier if the photos are taken horizontally, not vertically, but you can make any photo work with a little tweaking. For California, I knew I was going to have to piece together a few different 4x6" photos. Some states will need a 5x7.
Once you know the size you'll need, it's time to choose your photos. For me, I knew I'd be using our state sign pictures, then if I needed to piece together any photos I would use another picture from something fun we did in that state, like the Grand Canyon or some California palm trees. Your pictures can be anything fun that you did in that state, or whatever you want, we just chose state signs for ours. Choose something fun and memorable for your home state. I used one of my favorite pictures from our wedding for Missouri. Since I had to angle the photo to get our faces in it, I filled in the rest of the state with some black scraps from the photo. Scotch tape is your friend!
Next, you're ready to cut out! I know this is intimidating, but I promise friends, it's not as hard as it looks! I simply hold the paper state that I 've cut out over the photo, and then follow the lines with my scissors. Play around with the photos and see how they best fill the shape of the state. You'll have to get creative with states like Florida that have an awkward edge or panhandle, but just cut scraps of the photo out and tape them together until you get the shape you need!

Next, put your photos next to each other and see how they look. They don't have to be perfect. Consider overlapping or doing a few little snips here and there to make them fit together great.
Now, all of the hard work is done, and it's time to put your states on the map! Grab those pushpins, and stick them in the corners of the states so that they lie flat. You may need to over or underlap states to make them fit.
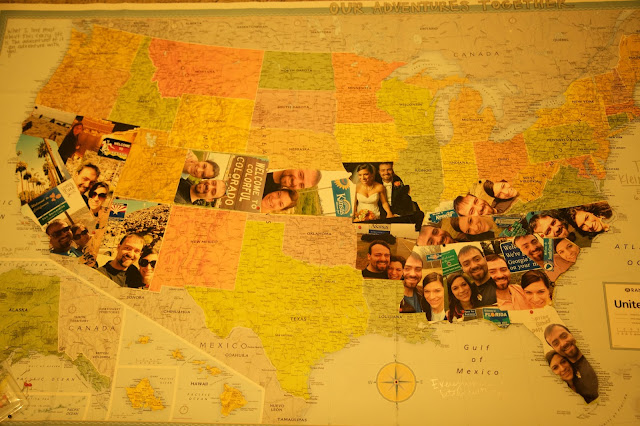
 See how I used several multiple photos from California, Arizona, and Nevada to make each of the states work? I love the way that they turned out!
 And there you have it: an updated and personalized map with photos of all of the states we've visited. Looks like we need to get to work on the North. (And I also need to find our Louisiana and Texas pictures). I promise, it's way easier than it looks!
Personalized photo maps make great gifts, keepsakes, and memories of travels- without costing a lot. Still have questions? Need some advice on a certain step? Let me know in the comments below, or on the contact form. I'd love to help you out. Have so much fun!
Currently,
Kelsie
I'm linking up with A Fresh Start, Wine'd Down Wednesday, The Quinntessential Mommy, Just us Four, Snippets of Inspiration, Just Another Linky, Twinkly Tuesday, Imparting Grace, Anderson and Grant, Feeding Big, The Handmade Hangout, AKA Design, Shaken Together Life, Bloom Designs Online, The Pretty Pintistic Party, The Painted Drawer, A. Liz Adventures, The Girl Creative, The Crafted Sparrow, and The Deliberate Mom.


Such a cute idea! You know I love me some maps and this is a great way to remember all of your adventures together. Thanks for sharing! :)
ReplyDeleteThanks so much, Lauren :) Maps are seriously the best. I picked up some cheap pages of an old one from First Fridays, and they're going on my gallery way! Thanks for reading and commenting!
DeleteLOOOOOOVE this Kelsie! I really want to make one now! Such an awesome gift! How big was the map you bought?
ReplyDeleteThanks Kayla! Looks like my map is 50''x32''. Hope that helps! Any size will do if you make the foam board fit the back, but I liked a bigger size so I could use bigger pictures, especially in those small East coast states! Thanks for stopping by :)
DeleteWOW Kelsie! This is incredibly creative and such a cool idea! I have never seen anything like this before! What a great way to capture your travels! Thanks for joining the Link-It To Me Link Party, I hope you will party with us again next week!
ReplyDeleteThanks so much, Chantal! It's been a blast, and I am so excited to have a full map someday. Thanks for hosting the party, as always. I look forward to it every week!
DeleteOh my gosh, we do this too and I've never thought to do this with the pictures we take!! Such a great idea!
ReplyDeleteThat's awesome, Shannon! You should totally put them to use like this that you can put on display! You could even do black and white photos if you wanted, depending on your decor desires. Thanks for stopping by!
DeleteThis is such a gorgeous idea!! I've pinned it for later xx
ReplyDeleteAliceMegan
Thanks so much, Alice! Let me know if you have any questions!
DeleteI love this! What a great idea! The end result is adorable.
ReplyDeleteThanks for sharing (and for linking up to the #SHINEbloghop).
Wishing you a lovely weekend.
xoxo
Thanks so much Jennifer! It's been a lot of fun seeing it fill up as we add more states and photos. Thanks for stopping by, and for hosting! Have a wonderful weekend!
DeleteOh wow! What a fantastic idea. I would have loved to have gone travelling! But a little impossible now, since I have two children. But we have been to Thailand and it was an amazing place!
ReplyDeleteThanks so much for linking up with #justanotherlinky hope you can link up again Sunday xx
Thanks Bethan! Thailand sounds amazing! Traveling is fun, but kids are amazing too :) Thanks!
DeleteWhat fun! My daughters and I took a TX to SC road trip last summer! I wish I'd thought to take state sign photos. (Although, as you point out, they're not usually located at particularly safe locations!
ReplyDeleteThanks for linking with #TwinklyTuesday.
It's been super fun, Sadia! I'm sure you can find some fun pictures in each place and make those work :) Thanks for reading and posting!
DeleteI have been planning to do this, but I wasn't quite sure how to go about sizing and shaping the pictures. Thanks so much!
ReplyDeleteYay! You are so welcome. Good luck, and let me know if you need anything!
DeleteVisiting from TWinkly Tuesday
ReplyDeleteI love your photo map!! what a great way to remember the places you've been;.
liz @ sundays with sophie
Thanks so much, Liz! We've had a great time with it. Thanks for stopping by!
DeleteWow, what a clever, sentimental, special map!! I love this idea.
ReplyDeleteThanks so much, Lindsay! I have had so much fun with it!
DeleteOH my gosh no way!!! We are doing this as well!!! http://inspirationindulgence.com/50-state-sign-challenge/
ReplyDeleteThat's awesome Chelsea!! Love it (and all your photos)! :)
DeleteThis is such a great idea! I would love to make something like this.
ReplyDeleteThanks so much Becky, we have had a blast!
DeleteThis is such a cute idea! I love that you guys have been to so many states together! <3
ReplyDeleteWell thanks so much! It's been such a fun adventure!
DeleteI adore this craft. I wish I had pictures in each state to share on one....hmmmm...I see a gift for family members. Thanks
ReplyDeleteKovescence of the Mind
Thanks so much, Sarah! I think you could make a great gift out of this!
DeleteThat is awesome! I love the creativity behind it and how it will be so personal. Think about when it is completely filled
ReplyDeleteThank you, Ashley! I can't wait for it to be fully filled!
Delete